
FAQ VIDEOS > PRINT & CUT ISSUES > NOT READING MARKS
NOT READING MARKS
CLICK > ARMS test_type 1 (82 KB) in pdf
CLICK > ARMS test_type 2 (82 KB) in pdf
It is rare that an Advanced Registration Mark System (ARMS) is defective, before calling tech support please isolate the cutter(sensor) by performing an ARMS test: necessary tools needed will be the Graphtec plotting pen, or blade if prints are on vinyl, PDF FILES:
ARMS test_type 1 (82 KB) or ARMS test_type 2 (82 KB)
This can be printed on a letter size bond paper of desktop printer.
IF SUCCESSFUL
Your sensor (cutter) is working properly.
Continue with the 4-STEPS below.
IF UNSUCCESSFUL
If it fails, please reset the cutter back to factory in step-2 below and try again.
IMPORTANT: If using 3rd party software like Onyx or Flexi Sign, etc. Please make sure the software is recent enough to include the driver for your model, if the ARMS test works contact Tech Support of the software being used to confirm proper workflow as Graphtec can’t help with this. Another option is to try a small print and cut job from Cutting Master out of Adobe or Corel, if successful contact then your software manufacturer for support.
STEP 1:
NOT ENOUGH SPACE AROUND THE IMAGE WHEN LOADING THE PRINT JOB TO THE CUTTER
SOLUTION:
Making sure you have the following spacing around the image when loading the print job on the cutter. If there is not enough spacing from the push roller to mark, expand mode can be enabled to widen the cut area.
STEP 2
INCORRECT CONFIGURATION OF MENU OPTIONS
Your print & cut is processed and controlled by software, so there is no need to modify or enable any option in the cutters ARMS menu. If settings are modified by accident it can cause misreading, offset, errors. If that happens please watch the below video to reset the cutter to factory default (Please note: your cutting conditions such as speed, force, etc. will be deleted).
SOLUTION:
STEP 3
WITH GLOSSY MEDIA/FINISH, THE CUTTER MIGHT DISPLAY ERROR MESSAGES

STEP 4
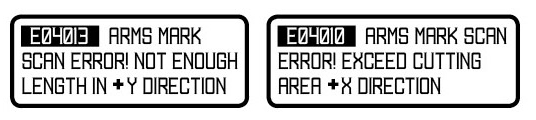
ERROR MESSAGE WHILE ATTEMPTING TO SCAN
Off scale means that the data or file differs in size from actual print or file is corrupt.
SOLUTION:
A) Make sure the print is loaded in the same orientation as the cut preview of the software, when using Cutting Master plug in is usually right side up.
B) Check push roller regarding spacing if error displayed is regarding Y direction, go back and check Step 1 Spacing Rules
C) if X-direction related error message please check the page length setting in the cutter: Menu > Media > Page Length, set to the highest amount (Max. 1048in), press "Fast" to increase the amount.
Note: both b and c have to do with a mismatch in scale (size difference between print and file), it is important to know this detail. Offscale error, or the error codes above are treated the same.
Note: when receiving these error codes, or scaling errors also check the Command sSetting on the plotter: MENU, IF, Command, HPGL or GPGL. All Graphtec software works on GPGL. FlexiSign for example uses HPGL. Please set accordingly.
D) If the issue remains and other files cut fine recreate the registration marks on the file and print again - when files are exported or saved to be opened and processed on a different computer, the registration mark layers can become corrupted. There are other reasons that files can become corrupted.
Click >> If the problem remains, please contact our Tech Support Team
FAQ, VIDEO > PRINT & CUT ISSUES > NOT READING MARKS